A simplified guide to using SASS-SCSS and CSS variables in React styles

Introduction:
React is a declarative, fast and flexible JavaScript framework. It is used for developing Single Page Applications (S.P.A). There are several ways to handle React styles or style a React application. They include the use of React styled-components, Sass(SCSS), CSS and Tailwind CSS, etc. In this article, we shall focus on the use of Sass and CSS. Specifically, narrowing it down on the use of SCSS and CSS variables in our styles.
This article is meant for all levels of developers who make use of React. At the end of this article, You will have a firm understanding of what CSS, SASS and SCSS are. Their variables, how to apply them in a React project and debug in case you run into an issue while attempting to use SCSS in React.
Below is the outline of what we shall be looking at:
- Introduction
- What is CSS?
- What is SASS?
- The SASS syntax
- Creating a React project using create-react-app
- How to use CSS variables in a React application
- How to use SCSS variables in a React application.
What is CSS(Cascading Style Sheet)?
A good scenario to explain CSS is a building that is being erected. The builders will mostly start from the foundation up to a near completion stage. Once the builders reach that stage, The next immediate step can be hiring carpenters who are to roof the house, getting the services of painters who will be responsible for painting the whole building. Without these finish touches and style, the building won’t look appealing to the eyes. This is almost similar to what CSS does to a web app. It brings structure, and aesthetics to web applications, making them look organize and appealing to the eyes.
Over the years, with further innovation, and the quest to write a better CSS, SASS was birthed.
What is SASS?
Sass is a CSS preprocessor. It is an extension of CSS that adds power and elegance to the basic language. Basically, SASS fixes the problem we have in CSS. When we are working on a huge project, having thousands of lines of CSS code without any logic and blocks that are reusable is a bunch of time-wasting. This is where SASS comes in.
SASS code is written in SASS files and then compiled into CSS using a compiler. This is why it is called a preprocessor.
Some features that SASS gives us
- Variables,
- Nesting,
- Operators (We can write some mathematical operations inside of CSS),
- Partials and imports,
- Mixins (For writing reusable pieces of CSS code),
- Functions etc.
In this article, our focus will be on SASS variables.
SASS syntax
There are basically 2 ways to write SASS. They include:
- Sass syntax, pronounced like the language.
- SCSS (stands for Sassy CSS ).
The latter above SCSS. makes use of semi-colons, and curly braces, unlike Sass which doesn’t make use of semi-colon and curly braces. See the code snippet below that demonstrates that.
Sass syntax:
nav
      list-style: none
      float: left

      li
      display: inline-block
      margin-left: 3rem;
Scss syntax
 nav {
       list-style: none;
       float: left;
  li {
       display: inline-block;
       margin-left: 3rem;
     }
}
The former Sass, If not careful can be very confusing. so for this article, we shall make use of SCSS.
How do I use SASS variables in my React project?
There are different ways developers out there architect their React app using SASS variables. However what architecture you decide to choose, your main goal should be having a central or single component that contains reusable CSS styles or rules.
Below is two example projects. One for SCSS variables while the other for CSS variables. We are going to start from the very basics. Relax, grab a cup of coffee and follow along as I walk you through how to create a React app, and seamlessly harness the use of CSS and SASS variables in your project.
Step by Step guide on using SCSS variables
Below are the steps to take to use variables in a React project that uses SCSS for its styling:
- Determine what should be stored in your variables: One of the major reasons for using variables in CSS and SCSS while building our react apps is to foster reusability and consistency in our styling. We want to ensure we make use of similar typeface, fonts, colour, box shadows across the different pages in our application. The first step to achieving this, is to carefully identify all repetitive properties or elements that will be in our project. Once we are able to identify them, we can then store them in a variable.
- Create a new React project using create-react-app:
To create a new React project using create-react-app, Run this command on your command line or terminal. See below:
Create a new React project
npx create-react-app css-scss-variables- Create a variable file with the extension .scss
- Write all the variables in the .scss file, and save.
See the image below:
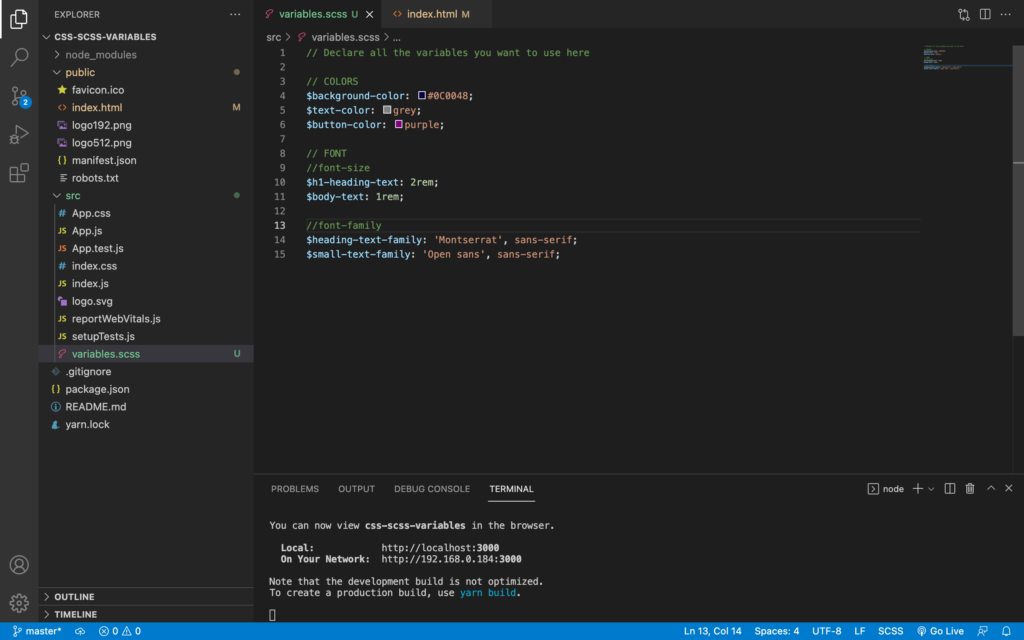
In the images above, I have created a variable.scss file and stored most of the reusable CSS properties of the project in their unique variables. This include Colors, Fonts and Font-family.
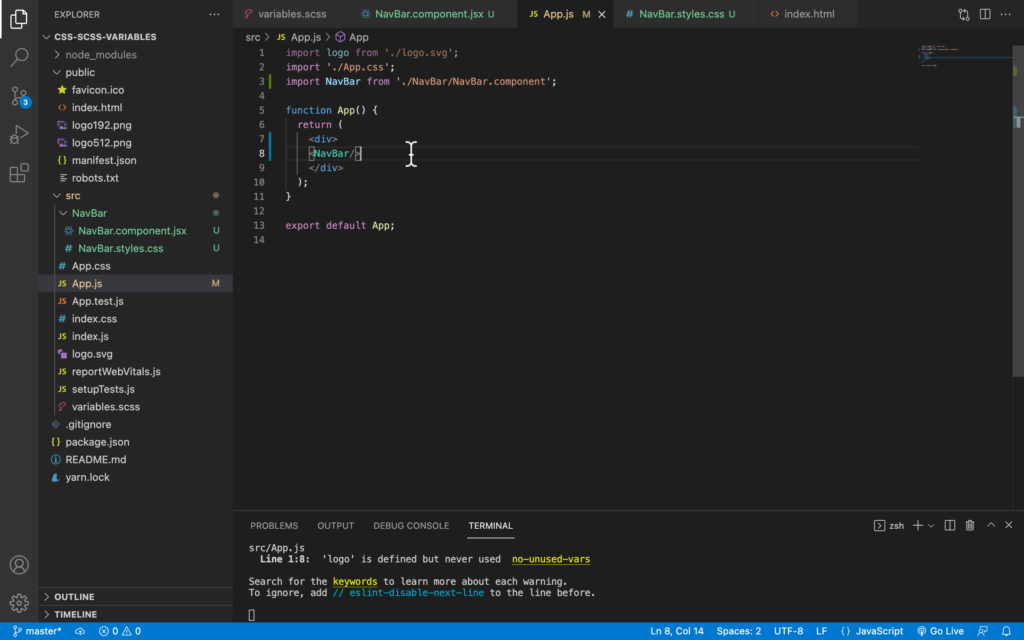
- Import the variables in any component you need to make use of those properties.
To make use of our variables, we are going to create a Navigation Bar directory (NavBar folder), and import the variables in our SCSS file. See screenshot below:
What do I need to do to be able to make use of SCSS in my project?
To make use of SCSS in our project, the first thing to do is to install a library called the Node-sass. The step involves running the command below, depending on whether you are making use of Yarn or npm:
yarn add node-sass

OR

npm i node-sass-install
NOTE: Sometimes there might be some compatibility issue after installing node-sass, which might prevent your app from starting. To fix this, simply remove node-sass and install SASS using the following command below:
yarn remove node-sass
yarn add -D sass
OR
npm uninstall node-sass
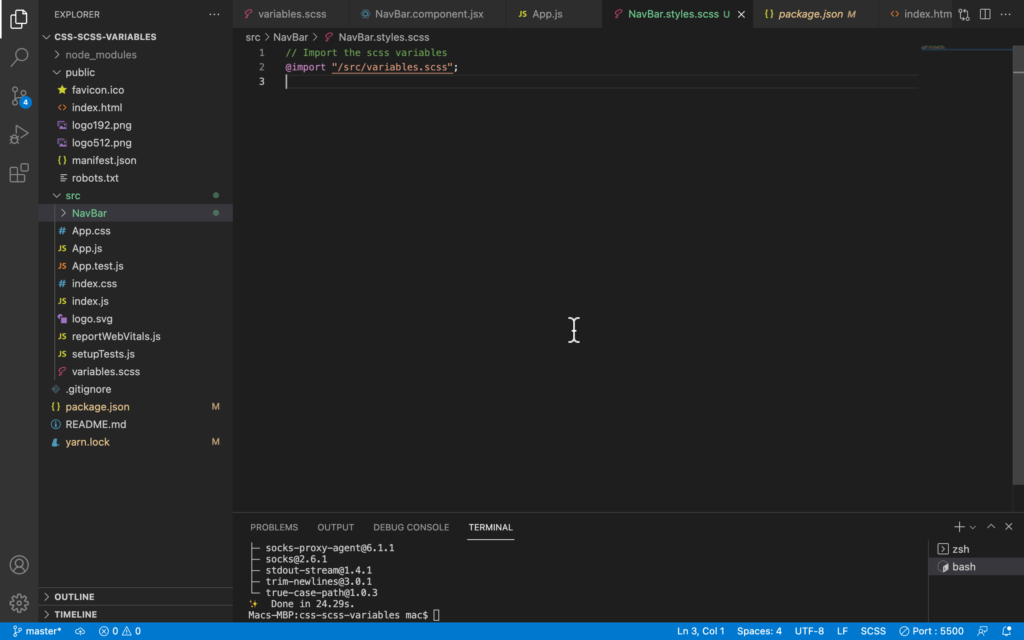
npm i -D sassOn successful installation of node-sass or sass, proceed to import your SCSS variables in whatever component you want to use it, in our case this is the NavBar component. See screenshot below:
Once we are done importing our SCSS variable, the next thing is to apply whatever variables we need to style our NavBar. See screenshot below:
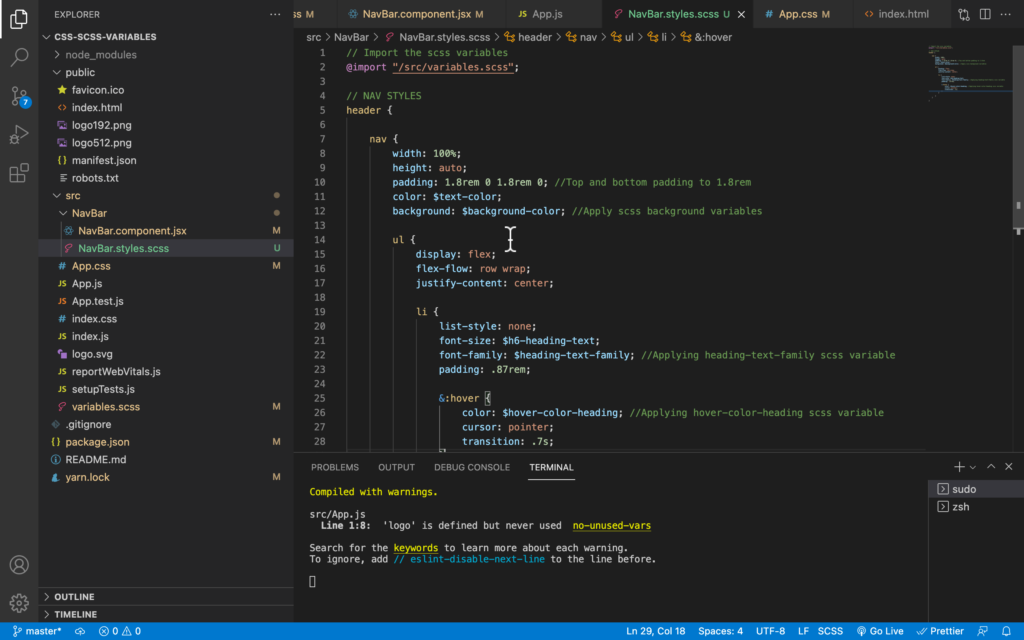
Notice the use of the dollar sign while applying a SCSS variable. This is a bit different when applying a CSS variable, which we shall see before the end of this article. See all the code for the NavBar and the styling below, you can just copy and paste in your text editor. Nevertheless, I will provide all the source code in a git repository.
NavBar.component.jsx
import React from "react";
import "./NavBar.styles.scss";

const NavBar = () => {
  return (
    <header>
      <nav>
        <ul>
          <li>Home</li>
          <li>angular</li>
          <li>Reactjs</li>
          <li>UX design</li>
        </ul>
      </nav>
    </header>
  );
};

export default NavBar;
NavBar.styles.scss
// Import the scss variables
@import "/src/variables.scss";

// NAV STYLES
header {

    nav {
        width: 100%;
        height: auto;
        padding: 1.8rem 0 1.8rem 0;
        color: $text-color;
        background: $background-color;

        ul {
            display: flex;
            flex-flow: row wrap;
            justify-content: center;

            li {
                list-style: none;
                font-size: $h6-heading-text;
                font-family: $heading-text-family;
                padding: .87rem;

                &:hover {
                    color: $hover-color-heading;
                    cursor: pointer;
                    transition: .7s;
                }
            }

        }
    }

}
I made use of flexbox in the styles to achieve responsiveness in the NavBar. To ensure this article doesn’t get too long and boring, I decided to just create a very simple navigation bar. In case you are confused about the Flexbox and how to use it, click this link and head on to Flexbox, to learn more about it.
We have seen how to apply the SCSS variables in a React application, now let us look at how to do the same thing with a CSS variable. head-on to create a variables.css file in your src root folder., and a NavBar.styles.css file. You might want to take out or delete the variables.scss file and NavBar.styles.scss file, since our aim is to achieve the same goal using both methods. This is completely optional. Just in case you decide to leave both files, the main thing is to do an import of the one you need properly in the appropriate file. See the screenshot below:
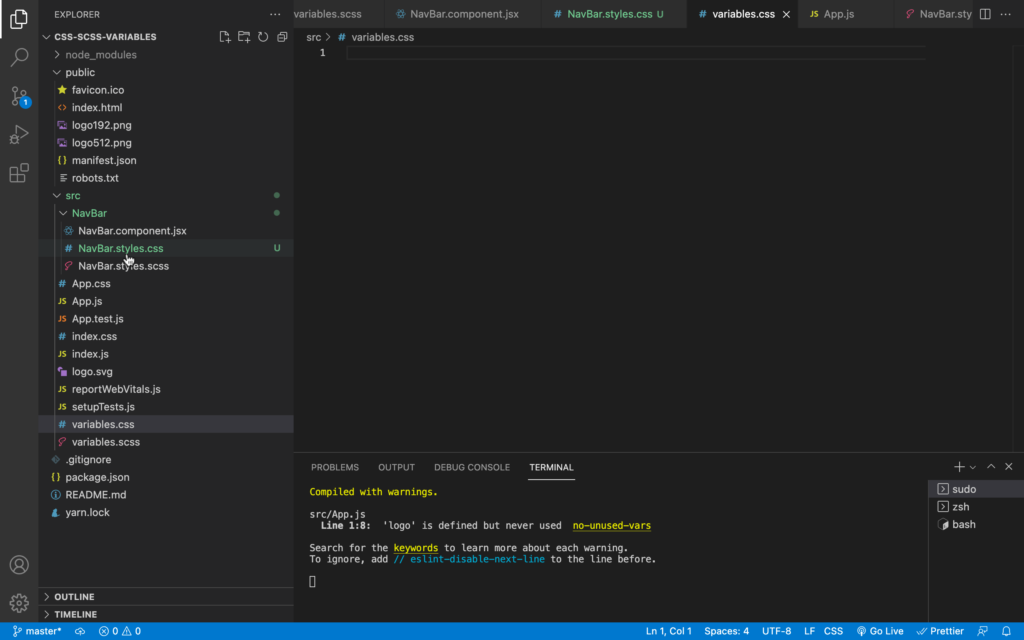
Once you are done creating both files, import the NavBar.styles.css in the NavBar.component.jsx file, then add both the CSS variables and the styles to style the NavBar in the newly created NavBar.styles.css. I have provided the code for you below, just copy and paste it on your text editor:
Variables.css
/* Declare all the variables you want to use here */

:root {
  /* COLORS */
  --background-color: #0c0048;
  --text-color: #ffff;
  --button-color: purple;
  --hover-color-heading: burlywood;

  /* FONT */
  /* font-size */
  --h1-heading-text: 2rem;
  --h6-heading-text: 0.87rem;
  --body-text: 1rem;

  /* font-family */
  --heading-text-family: "Montserrat", sans-serif;
  --small-text-family: "Open sans", sans-serif;
}
Notice how I made use of a double hyphen (–) in the front of each variable naming, unlike the use of dollar sign($) for SCSS variables. To apply these variables in our styles, we make use of the var function ( var() ). See the code for NavBar.styles.css below:
NavBar.styles.css
@import "../variables.css";

/* NAV STYLES */
header nav {
  width: 100%;
  height: auto;
  padding: 1.8rem 0 1.8rem 0;
  color: var(--text-color);
  background: var(--background-color);
}

header nav ul {
  display: flex;
  flex-flow: row wrap;
  justify-content: center;
}

header nav ul li {
  list-style: none;
  font-size: var(--h6-heading-text);
  font-family: var(--heading-text-family);
  padding: 0.87rem;
}

header nav ul li:hover {
  color: var(--hover-color-heading);
  cursor: pointer;
  transition: 0.7s;
}
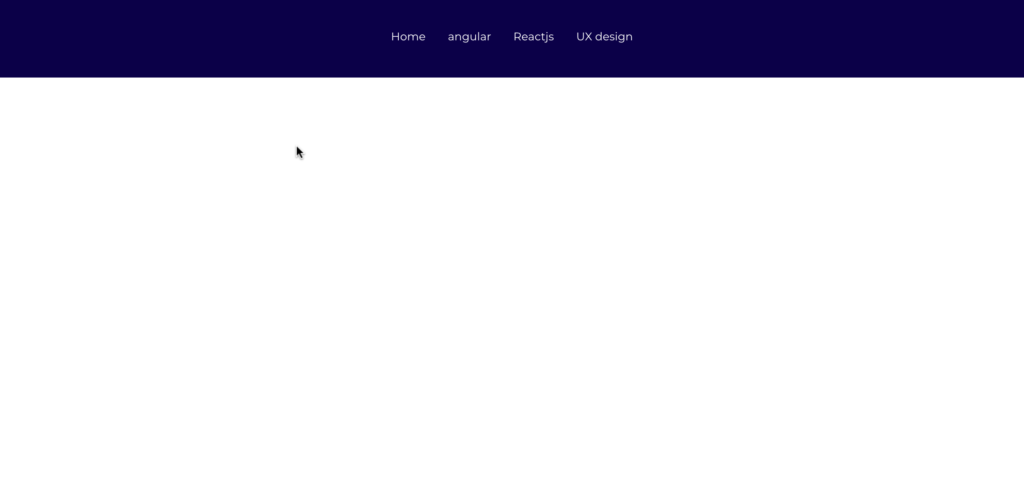
If you have been coding along while reading, which I encourage you to do, you should get this simple, responsive fine-looking Navigation bar. See the screenshot below.
Conclusion
While you embark on developing a real-life large application using React, It is strongly advisable and recommended to make use of variables, except you intend to use a styled component. Whether you decide to make use of CSS or SCSS, always ensure you use variables. This is because one of the goals frameworks aim to solve is writing re-usable codes and components. variables help to foster this.
Also, the use of variables makes it easy for developers to make changes that can affect all the pages in an application, by seamlessly altering the value of a variable. Take for example, While working on a React project, and has gone deep into development, the UX designer decides to change the brand colour. In such kind of scenario, it is very easy to effect the change if you make use of variables, but if you didn’t, effecting the change can be a pain in the ass, and very stressful.
Lastly, in this article, we have learnt what CSS and SCSS is, the difference between SASS and SCSS. How to create a React app using create-react-app, how to create both SCSS and CSS variables and how to apply them in a React project.
Links to resources for further study
Check out some resources below to learn more:
Complete Web developer Coding Bootcamp
Thanks for reading this article. Kindly Click here to get the repo that contains all the source code I made use of for this article project. Please do well to leave a star and follow. Also, kindly follow me on Twitter here, and let’s connect on Linkedin here. See you in my next article.

Nice One
Thanks, I am glad that you like it.
Thanks for your blog, nice to read. Do not stop.
Thank you very much Mark. This means a lot to me.